Sunday 30 January 2011

Home Bargains bargains!

Home Bargains (also called Quality Save in some places) is always worth a look in terms of craft stuff. Sometimes theres nothing, and other times there's loads! Today I picked up a few things worth mentioning.
First are these stickers. Each pack was 69p and is actually 3 packs in one: 6 toppers/embellishments, 20 holographic stickers and then 60 more basic stickers. The toppers are really nice quality for cards.
I got 5 packs(left to right): Jungle, Beach, School, Farm and Dinosaur. My favourite was jungle, and I would have bought more of that, but it was the only set they only had 1 pack of!


Next are some stamps. These were in the childrens craft aisle too, but I bought them because I don't really have any stamps, for making childrens cards. Plus they were only 59p a pack.
 

I thought it was worth giving them a try, and I was suprised at the quality of the image they stamped! Especially the fairy ones.
Here's a quick lesson in inks though! The ink they supply with the stamps was AWFUL. I appreciate that it's for kids, and that it needs to be washable, but seriously, if I'd have stamped with it I wouldn't bother stamping again.
Here's a photo comparing the ink they supplied, alongside my basic black Ink It Up! ink.

They're really not doing justice to their stamps, which in my opinion are really quite good. Let me know what you think!

Thursday 27 January 2011

Waltzingmouse CASE card


Over at Waltzingmouse there is a competition to do a CASE card. What, I hear you ask, is a CASE card? Well I wish I knew, but my interpretation is that you are inspired by a card and produce something based on that idea. I call it Copy A Stunning Example!
So I chose Anya Schriers card below as my inspiration, I'm sure you can see why!

I started by stamping my images onto some white card. I rarely stamp and cut out, but thought I would for a change. I mainly used the Walztingmouse Teeny Trees set. I stamped a variety of colours for the trees (Forest Moss distress ink, Olive Pastel Colourbox and Warm green Colourbox.) The trunks were stamped with Chesnut Whispers, the sun with mellow moss. Once they had dried I cut them out.

I used my spellbinders labels 1 die to cut the frame from the inside of a cereal box. I would have liked the frame to be thicker, but that made the inside of the frame too small for the images I was using. I want some Grand dies!!!
  So I used the two larger dies from the standard set. The great thing about doing frames is that you're left with a lovely extra label for another project!

The final thing was to colour the sun with a yellow embossing pen and then emboss with clear powder to give it a little shine (it doesn't show up well on the photo). Some green paper was ripped to make the hills and I used a tiny amount of cracked sapphire distress ink to give the background a light blue touch.
I hope you like it!

Tuesday 25 January 2011

Purple Cow guillotine and trimmer bargain - Costco

I had been coping with an A5 guillotine for years, and it annoyed me every time I had to cut down A4 paper. So before christmas I went into Costco at Haydock (I know different ones stock different things) and they had these Purple Cow 2 in 1 Guillotines for just £17.99 + VAT. I was so excited, and I knew I had to have one - even though my Christmas money was exhausted. I considered this a necessary piece of equipment, so bought it anyway! I did consider not mentioning it to Honey when I got home - especially as when we were in a craft shop recently a lady told me she hid alsorts from her husband, including a Big Shot Pro!!! - but I couldn't do that, so I sheepishly told him!!! Its not just the fact its a guillotine, its got a removable paper trimmer. I'd actually call it a 3 in 1, because you can use both parts independently, then together. The trimmer part also holds the standard purple cow blades which interchange with all their products. It come with 3 blades: straight, perforate and wave. The other thing I particulary like is that the trimmer part actually clips down at both ends to hold the paper in place whilst you trim.
Anyway, I was convinced that when we went back after Christmas this would have sold out, but this weekend they still had loads of stock! So get on down to Haydock if you fancy one! They're £37.95 on Amazon! http://www.amazon.co.uk/gp/product/B0047WDN56/ref=pd_lpo_k2_dp_sr_2?pf_rd_p=103612307&pf_rd_s=lpo-top-stripe&pf_rd_t=201&pf_rd_i=B0034CGZUK&pf_rd_m=A3P5ROKL5A1OLE&pf_rd_r=1BENBXWQ6Q6T9ZBYDTRJ

Monday 24 January 2011

 
Heres a card I made for a friend who's birthday was last week. I don't have any number stamps, or dies, so instead I used my digital scrapbook package to print off the numbers. I first typed out the word "thirty" in different fonts and put them in the background of the numbers. I printed them off and cut them out, then made a frame for them using baby blue card. My largest labels dies were not big enough, so I used a technique I learned over at Ikkis cuttlebug cupboard http://www.ikkiscuttlebugcupboard.blogspot.com/, which is to partially cut with the die, then remove from the machine, then partially cut another section and then cut the middle out by hand. I'll try and take some pictures of this technique another time. I inked around the edge of the pink label with some pink ink, and also the edge of the numbers.

The background papers were printed off from digital scrapbook artist. I made a piece of A4 cream card into an easle card and used some more baby blue card for the easle prop. I used my new Purple cow guilltine/trimmer with its crinkle edge and stamped the sentiment "lets celebrate" from my Papermania sunflower set.

I thought it looked nice, but still needed something, so I did something I never do...flowers! I found some flower punches when going through my mums crafting box, and decided to punch some out! The larger of the 2 flowers I punched in cream card and inked the edges. The smaller flower I punched from the stripey background paper.
I was really pleased with how the flowers finished it off.
Hope you like it!

Sunday 23 January 2011

Early morning Inspiration!

Getting up early on a weekend with the monkey does have some benefits...uninterrupted use of the laptop! This morning I was surprised (but extremely happy!) to have a new follower, and somebody who isn't a member of my family! Not sure how they found me, but I'm very pleased they did. So I went on by to look at their blog  http://re-crafts.blogspot.com/, a cool crafting website including some bee inspired crafts!

After a few steps I also blog hopped my way to these:

http://elsita.typepad.com/allaboutpapercutting/
Anyone who can make this (its the size of a 50p!) from paper is a genius!

This blog is beautiful, and has loads of wonderful paper projects to try.

Blog hopping is so much fun!
Take a look. x

Saturday 22 January 2011

No more shims!

So today my No More Shims Maxi embossing mat arrived! I was so looking forward to it, as its a belated Christmas present, and I've been making do with my improvised embossing mat since mid december.
My improvised embossing mat was a computer mouse mat which I had cut so it fit through the cuttlebug. It did a reasonable job of embossing the edges of my spellbinders dies, but not anything else.
I'd bought a few stencils - brass and plastic - which I was hoping to be able to emboss, and so to have the No More Shims was really exciting!
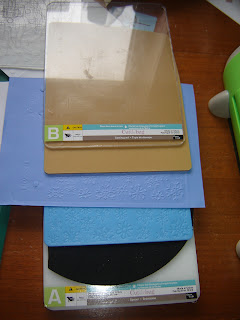
So the first thing I tried to emboss with was a plastic stencil. This worked with the sandwich they suggested (A-B-Stencil-paper-matt-B) and did a good emboss with paper.

I then moved on to some textured plates by Fiskars I've had about 5 years. They have this little texture tool you emboss with, but it takes ages and made my hands hurt, so I rarely use them, which is a shame, because there are 12 cool patterns.
So I attempted to use this in the same sandwich, but the texture plate made it just too thick. I removed one B plate and replace the final B with a C, but unfortunately it was now not thick enough. I was gutted that I wouldn't be able to use these, so I went back to my improvised embossing matt and created this new sandwich.

(A-mouse matt-texture plate-paper-embossing matt-B)
This worked!Yey!

This picture isn't too clear, but the left section is a piece of paper I tried to emboss with the texture plate and just the mouse matt - it didn't work!. The right is the actual texture plate, and in the middle is the embossed paper when using the no more shims!

Lastly I tried some metal stencils I'd bought. Because the're very thin metal this worked well with paper, but not great with card, but thats understandable. With the bee stencil I also tried inking up the stencil and then embossing which looks quite good.

So all in all I'm really pleased with my new embossing matt, I haven't tried any other brand so I can't compare, but it worked really well compared with my improvised one!!!! Can't wait to try with my spellbinders!
Thursday 20 January 2011

Paper stash!!!

So today I went to pick up some paper/card stock. In actual fact it is wallpaper, but its amazing quality paper! My parents wallpaper business has closed down the retail side, and so there are lots of old pattern books which were going to be thrown away, so I went and browsed for what would be good for making cards. There was SO much to choose from, the only limitation was the room I have to store it at home!
Heres a picture of what I brought home.
I also spotted these stampers. The large one has 3 letters and 3 numbers, eg ABC123. The smaller one is a date stamp. Not sure what I'll use them for yet (although small one will be good for birthday cards or weddings) but always good to have!


This shows the small pieces I cut, the're about A5 size.


Here are the 12"x12" size pieces. The back pieces are all beautiful angel hair, at the front there is some amazing suede paper (SO soft!), cork paper, and rattan paper.
Below are some beautiful 20"x20" patterns, metallic trees(left) and leaf outlines (right).

More 20"x20" pieces in a variety of patterns (stripes, herringbone, etc) and some plains.


I spent half the afternoon cutting out the paper that I wanted from the smaller pattern books, and left the biggest one intact, as I didn't have any storage to put the pieces if I'd have cut it up. I reckon theres about 70-80 large pieces (20" x 20") and around 100 about 12"x12" and about 300 A5 pieces. Can't wait to use some of these beautiful papers!

Wednesday 19 January 2011

Love Mask card - waltzing mouse bloghop


Heres my take on the theme of Love for this months bloghop.


I was inspired by a lovely masked card I saw to make this, and decided to use my Spellbinders labels 1 as a template for my mask - this is where you cover part of your card and stamp around or inside to create an image. I tried using a piece of card I had already die cut, but due to the thickness of the card my stamps didn't give a crisp edge to the mask, so instead I drew round the label onto a post-it note and cut it out. This was especially good as it then stuck in place and I didn't have to worry about it moving as I stamped.
I then used some tiny stamps I have to stamp all round the edges. I used Forest Moss Distress ink and most of the stamps were from a SeeDs set of vintage sewing I have.


I then looked around for a Love sentiment, and found one I liked at the end of a "Lots of Love" stamp. Its from the Honey and Hugs papermania set.

 I've only recently started partial stamping, but it opens us a whole new world to some of my stamps, especially sentiments! You just ink up part of the stamp (being very careful not to get ink on the rest!- and then stamp. I've even started to cut some of my acrylic stamps so I can rearrange the words!Just be brave!

I stamped the word 'Love' in the centre, and then to finish it off used my new Waltzing Mouse Teeny Trees stamps to add the two cute birds to the centre of the image!
I'm quite pleased with my first attempt at masking!

Monday 17 January 2011

Little Room Hanger

Here's a little room hanger I made last night when I came home from church. The preacher inspired me by saying he had this up in his study, and I agreed that its a very humbling verse. Its from a parable in Lukes gospel that Jesus is telling.
I decided I wanted to make myself a little reminder, and so used my Spellbinders Labels 1 to make a frame, and I used some cardboard (like a cereal box thickness) for the frame. I then stamped the circles image with clear ink and embossed. The stamp is from my wonderful new Waltzingmouse stamps called Tiny Trees. I can't wait to post some of the cute cards I've made from that set!
I printed off the verse onto cream cardstock and then used Tea Dye and Forest Moss distress inks to distress the main verse. I lastly gently inked around the frame and attached some twine to hang it.
I hope you like it, its now hanging in the spare room looking lovely...think I sense a theme coming on, and a variety of these with my favourite verses on!

Sunday 16 January 2011

Christmas leftover Recipes 2: Mincemeat muffins

The thing I often have left over at Christmas is a jar of mincemeat, or more annoyingly ½ a jar! So what better way to make good use of it than making some muffins! You’ll be very popular if you present these at work(although all my work colleagues seem to be dieting!), or when visiting friends, and they don’t taste TOO Christmassy.  The great thing about this recipe is that its very quick and very easy to make, plus the ingredients are all store cupboard staples. This makes 12 small cakes, but can easily be doubled(or trebled!).
Ingredients
120g (5oz)  Self raising flour
¼ tsp salt
1 tsp baking powder
1 large egg
50g (2oz) butter (melted and slightly cooled)
40g (1 ½ oz) Caster sugar
75ml (3 fl oz) milk
Approx 175g (6 ½ oz) Mincemeat

Method
1.Preheat the oven to 200°C (gas mark 6, 400°F), To start, sift (If you can be bothered, I never do!) the flour into a large bowl and add the sugar, salt and baking powder.
2. In a separate bowl/jug beat the egg and add the milk and butter, when you’ve mixed this add the mincemeat and give a thorough stir. (The mincemeat will sink and not want to mix, but this will make more even muffins if you do this)
3. Add the mincemeat mix to the flour bowl and with a large metal spoon (if you have one!) combine loosely (about 15 seconds). The mixture shouldn’t look like a sponge cake mixture, all nice and smooth, only stir a few times until most of the mixture is combined, there should still be some clumps of flour.
4. Spoon the mixture into your muffin tins and put in top of oven for 15-20 minutes. When they’re nicely browned and risen take them out of the oven and then after 5 more minutes take out of tin and move to a wire rack so they don’t sweat in the tin.
Just before eating dust with icing sugar! Yum yum!

Friday 14 January 2011

Christmas Leftover recipes -1. Nigellas Christmas Pudding Truffles

Well as someone has requested recipes, I thought I'd start with a series on using those Christmas leftovers. I don't know about you, but I always seem to end up with a spare Christmas pudding, 1/2 a jar of mincemeat (no, I don't make my own!) and various chocolates, so heres recipes 1.

Ingredients
  • 125g best-quality dark chocolate, finely chopped
  • 350g leftover, or freshly cooked and cooled, Christmas pudding
  • 60ml sherry
  • 2 x 15ml tablespoons golden syrup
      FOR DECORATION:
  • 100g white chocolate, finely chopped
  • 6 red glacé cherries
  • 6 green glacé cherries
1 Line a baking sheet (that will fit in the fridge) with clingfilm, baking parchment, or  foil and set it to one side while you make the bonbons.
2 Melt the dark
chocolate
in a heatproof bowl suspended above a pan of simmering water, or in the microwave according to the manufacturer's guidelines.

3 Crumble the cold Christmas pudding into a bowl, add the sherry and golden syrup and stir till all is incorporated.

4 Pour in the melted dark chocolate and stir again: this will make the mixture much more sticky.

5 To make this step easier you could use those disposable gloves, but a little vegetable oil on your hands works too, pinch out small lumps of mixture and roll so that you have little rounds about the size of a chocolate truffle. You should get about 30 out of this mixture; fight the impatient urge to make these balls larger as you go.

6 Cover with clingfilm and slot into the fridge to firm up.
You don’t need to decorate these, especially if at this time of the year Christmas seems a distant memory, but they are super cute when decorated.

7
To decorate, melt the white chocolate either in a heatproof bowl suspended over a pan of simmering water, or in the microwave, then let it cool for about 5 minutes, to make it easier to work with, while you chop the red cherries into small pieces (like berries), and snip the green cherries, to represent leaves.

8 Using a teaspoon, drip a little of the melted but slightly cooled white chocolate on each truffle, then arrange the sticky pieces of cherry on top (a cocktail stick helps stop getting your fingers sticky when doing this).

9 Eat!

Next time: Mincemeat Muffins.

Tuesday 11 January 2011

Two new techniques...new to me!


Well tonight I bring you a birthday card I've recently made, and whilst making it I was playing around with a couple of new tecniques and products I have.
On the main card I used one of my new Wild Asparagus stamps from Minds Eye. Its a lovely Art Deco inspired flower. I did the background strip in Papermanias dark blue ink and then stamped a Labels 4 nestie with the stamp along with an art deco sentiment. All pretty standard up til now. I then tried something which I'd spotted on Ikkis Cuttlebug cupboard( http://www.ikkiscuttlebugcupboard.blogspot.com/ ) which uses 3 layers of clear embossing.  I was a bit dubious at first, and as a first attempt it wasn't perfect, but it gives this lovely glossy, almost enamel like finish. I'm really pleased with it, and am already planning future projects with this technique!

The second thing is Shrink Plastic! I picked some up at the Range a few months back, purely out of intrigue. Since then I've seen it demonstrated on Create and Craft and have been meaning to give it a go. I was thinking I might use the charm I made on the same card, but in the end decided against it. I started by cutting the shrink plastic in my cuttlebug using the same labels 4 nestie as the central image. I then stamped the same flower on it and as it wasn't that clear went over the stamp with a blue Sharpie marker. I'm really glad I did watch the demo as when you start heating it with the embossing gun it starts to shrivel and I panicked a little, but I remembered them saying to just push through that stage and it'll get better...and it did! I was so pleased with my little dinky embellishment, it is so cute! I put it on the picture next to the card to show just how much it shrank! I have no idea what I'm going to use it for, but its very cool. I might buy the white shrink plastic next time as it might show the stamping up better.
Anyway, hopefully I might inspire you to try these two techniques now, they're very satisfying, and also very fun to do!

Friday 7 January 2011

Todays exciting presents!

My dad brought round a few things tonight, first of all my belated Christmas present from James which missed the Christmas post.
 After my recent quilting success I decided I wanted my own quilting book. I can't wait to have a look and get some inspiration. I may try a quilted card aswell, we'll see!
 This next thing was inspired by some friends Christmas cards.
 They are both designers, and run Slight http://www.slightnet.co.uk/flash_content.html and their cards are always inspiring. This year they simply stamped Happy Christmas 25th December with one of these desktop printing sets onto plain white card, it was really simple, yet very effective. I contemplated buying a set, but even better my dad found me one that he doesn't use!!!! Keep an eye out for cards featuring this in the future!!

Wednesday 5 January 2011

Star Cards

Here are a couple of cards I've made in the last few months with a star theme (I love stars!). The top one is one I made for my niece's 2nd birthday. It is a 6" square easel card with a star front. I used the embossing board on my Ultimate Pro to do the star shapes and the papers are actually from a small Christmas stack which I got free on the front of a craft magazine. The word "two" is made from some cardboard stickons I got in a craft bundle, which I covered in ink and then embossed silver. The larger star is pearlised card in a white/silver which I have inked around the edges with pink.
 This second card was to celebrate the birth of my friends little girl. This is an A5 card on white cardstock. I've used the Ultimate Pro embossing mats again for the star shapes, and also the banner shape. The two vertical stripes and the background paper of the star are girly sentiments from a mat stack I've had for ages. I used the cardboard letters again for the name, and finished off by using straight silver peel offs down the sides and around the star (very fiddly!) and then attaching some standard silver stars around the back.

Sunday 2 January 2011

First card of 2011!

Its my grandma's birthday tomorrow, so here's the card I just made for her. I used my cuttlebug to emboss a plain white square card, and then used my new distress ink - cracked sapphire - to highlight the embossing. I then cut a labels 4 nestability from dark blue cardstock, stamped a sentiment onto some ivory cardstock and made a faux nestie by using the same size nestie and drawing inside the die to get an 1/8 inch nest. I read somewhere - possibly http://www.ikkiscuttlebugcupboard.blogspot.com/ - that the best way to do a faux nestie is to use the die for the larger one and hand cut the inner, as its less noticable if its not perfect. I was pleased with how it looks, and think I agree with that way round. To hide any imperfections in my cutting I just sponged around the smaller one with the distress ink again.
Quite a simple card, and very quick to make!